Hello all…
Any idea
about Raspberry Pi?
If you have
followed my previous page, you might have known something about Raspberry Pi. I
would like to share on how it works with GPIO functions in this blog. Unlike
Arduino Uno, Raspberry Pi 2 is more sensitive to any short circuit or current
leakage. I suggest every user to check the pins properly before putting any
wires on it.
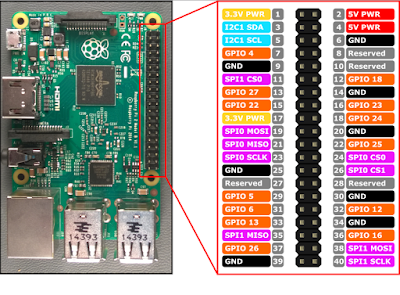
The GPIO
built on Raspberry Pi 2 retrieved from some online resources:
I have
printed it nicely and stick to my file which I’m using every day. I like to see
this as my wallpaper as well LOL.
Let’s get
started with the hardware configuration.
I am using
few components which included:
1. A LED
2. 220 ohm
resistor
3.
Breadboard
4.
Raspberry Pi with some jumper wires
By using
Fritzing, I have assembled everything on a virtual board with Raspberry Pi.
Here’s the
schematic:
Next, we
are gonna build up the python script.
Go to the
Start menu, search for LX terminal.
Type: sudo idle
Once the
Python Window pops up, open a new file (CTRL + N)
Type in the
following code:
************************************************************
import
RPi.GPIO as GPIO
import time
GPIO.setmode(GPIO.BOARD)
GPIO.setup(26,GPIO.OUT)
while True:
GPIO.output(26, True)
time.sleep(1.0)
GPIO.output(26, False)
time.sleep(1.0)
************************************************************
Then, save
it as py. File and run it (press F5).
If it fails
to work, add in the following line:
GPIO.setwarning(False)
Or change
GPIO.setmode(GPIO.BOARD)
into
GPIO.setmode(GPIO.BCM)
Or change
GPIO.setmode(GPIO.BOARD)
into
GPIO.setmode(GPIO.BCM)
Then, try
to run it.
See you
again.


No comments:
Post a Comment