My first idea about machine vision or digital image processing is about how Terminator detects its surrounding with its virtual head-up display. Arnold Schwarzenegger has always been my idol ever since he played a good role in the movie.
I was fascinated by the way he scans the surrounding with his eyes (camera). What appears in his visual system ?
I was fascinated by the way he scans the surrounding with his eyes (camera). What appears in his visual system ?
Back to the topic, I am having machine vision class this semester. Machine vision defines me the technology and methods used to provide imaging-based automatic inspection and analysis for such applications as automatic inspection, process control, and robot guidance in industry (Wikipedia). Digital image processing as part of machine vision is one of my favourite subject.
Based on online resources, I have found a suitable platform to learn more about the application of image processing. It 's known as OpenCV ( Open Source Computer Vision).
The following introductory statements is taken from its official website.
OpenCV is released under a BSD license and hence it’s free for both academic and commercial use. It has C++, C, Python and Java interfaces and supports Windows, Linux, Mac OS, iOS and Android. OpenCV was designed for computational efficiency and with a strong focus on real-time applications. Written in optimized C/C++, the library can take advantage of multi-core processing. Enabled with OpenCL, it can take advantage of the hardware acceleration of the underlying heterogeneous compute platform. Adopted all around the world, OpenCV has more than 47 thousand people of user community and estimated number of downloads exceeding 9 million. Usage ranges from interactive art, to mines inspection, stitching maps on the web or through advanced robotics.
Sounds interesting ?
Let's get started with Windows version !
Get to the link: http://opencv.org/
Download the latest library files (mine is v2.4.10) for Windows version.
First of all, we need to use a development environment with the libraries involved. In this case, I'll be using Microsoft Visual Studio 2010 as it has been installed in my lappy.
Besides, set the environment path in the computer.
Go to My computer/System properties/
Click on Advanced System Settings/Environment Variables
Create a new used variable by copy and paste the directory where you saved the downloaded file.
D:\opencv2410\build
Next, edit on system variables: add in this line
;%OPENCV_BUILD%\x86\vc10\bin
Let's create a new file in Visual Studio
Create a new file with Win32 application:
Once the new file has created, right click on project's title/properties in solution explorer.
Choose Active Debug configuration. Click on configuration properties/C/C++/General.
On the text box for additional include directories, copy and paste:
$(OPENCV_BUILD)\include;%(AdditionalIncludeDirectories)
Choose Linker/General. Copy and paste:
$(OPENCV_BUILD)\x86\vc10\lib;%(AdditionalLibraryDirectories)
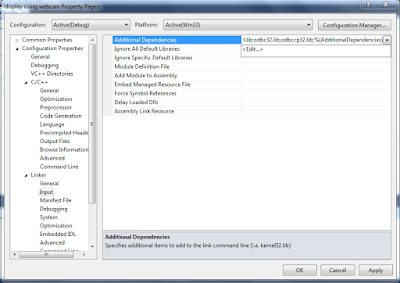
Next, Linker/General look for additional dependencies. Insert the libraries. These are the basic libraries. You can always insert more than what I have provided. Do remember to change the name if you're using different version (2410 means v2.4.10)
opencv_core2410d.lib;
opencv_highgui2410d.lib;
opencv_imgproc2410d.lib;
opencv_video2410d.lib;
%(AdditionalDependencies)
Finished. Let's go for a quick ride.
#include "stdafx.h"
#include <stdio.h>
#include <opencv2/core/core.hpp>
#include <opencv2/highgui/highgui.hpp>
using namespace cv;
int main()
{
Mat pic;
VideoCapture vid;
vid.open(0);
namedWindow("Screen",1);
while(1)
{
vid>>pic;
imshow("Screen",pic);
waitKey(33);
}
}
It should be able to display with your webcam.
Thank you.


No comments:
Post a Comment